Bearded Dragon Starter Kit Essentials: (Everything You Need Before Bringing One Home)
My Journey Building My First Bearded Dragon Starter Kit
When I first decided to bring home a bearded dragon, I’ll admit I was overwhelmed. There were so many products, tips, and variables that every list seemed contradictory. Over the years, after building multiple setups and refining my gear, I now consider myself a bit of a starter-kit guru. I’ve learned the hard way which items are essential and which are gimmicks. In this article, I’ll walk you through how to assemble a reliable, functional bearded dragon starter kit—step by step—from the gear I swear by, mistakes I learned from, and how to future-proof your setup so your dragon will thrive.
Why a Good Starter Kit Matters
Avoiding Common Mistakes
One of the biggest lessons I learned early is that a poor starter kit often leads to chronic health issues for dragons. Skimping on UVB, selecting the wrong tank size, or choosing unsafe substrate all lead to long-term complications. When my first dragon suffered a minor calcium deficiency because the UVB wasn’t strong enough, I swore I’d never let that happen again. A solid starter kit is more than just gear—it’s your dragon’s foundation for health.
Long-Term Health vs Shortcuts
It’s tempting to save money by picking cheaper gear—but those shortcuts add up. Replacing low-quality fixtures, dealing with illness, or buying new tanks later can cost more than a good kit from the start. I now encourage new keepers to see the kit as an investment, not a one-time cost. When your dragon lives 8–15 years (or more), that early investment pays dividends in quality of life, health, and fewer emergencies.
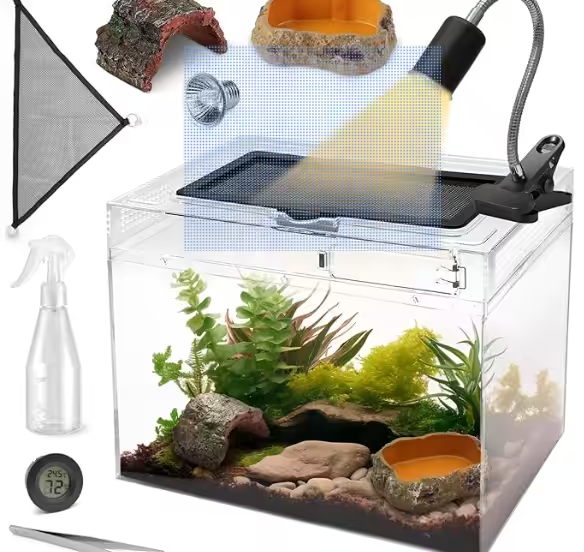
Components You Need in a Starter Kit
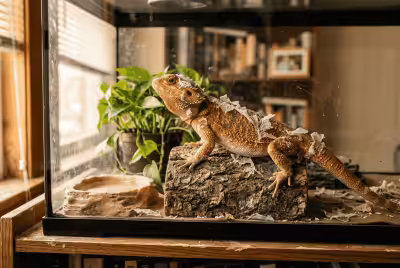
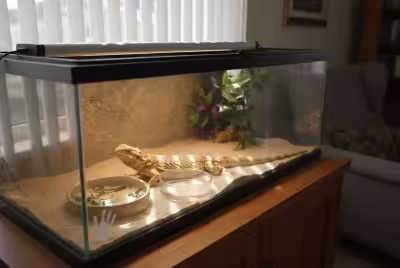
Enclosure (Tank / Terrarium)
Your enclosure is your dragon’s world. For hatchlings, many use a 75 × 45 × 45 cm (30 × 18 × 18 in) tank, but I recommend upgrading early to avoid cramped growth. For adults, I aim for at least 120 × 60 × 60 cm (48 × 24 × 24 in). Glass or PVC enclosures both work; my preference leans toward bioactive-ready enclosures with screened tops. A secure, ventilated lid is a must to prevent escape or overheating.
Lighting & UVB System
UVB is non-negotiable. Without it, your dragon can’t metabolize calcium properly. I use high-quality T5 HO fluorescent/LED UVB systems rated 10–12% (or equivalent) and place them so that the basking zone is within the recommended distance (usually 8–12 inches, depending on the brand). Always pair with full-spectrum daylight bulbs for visible light—dragons need stimulus, not just UV.
Heating & Thermoregulation
Your starter kit should include a basking bulb (halogen, ceramic, or heat lamp) plus a secondary ambient heat source if needed. I also use digital temperature probes (one in the basking zone, one in the cool side) and a thermostat to regulate fluctuations. That gradient—hot spot to a cooler side—is critical so your dragon can thermo-regulate.
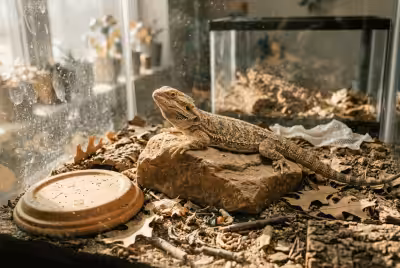
Substrate & Flooring
Substrate choice often causes the most debate. I avoid loose sand and wood chips for young dragons because of impaction risk. In my starter kit, I use reptile carpet or slate/tile lining for ease of cleaning. For more naturalistic setups, I reserve a small dig box with sterilized topsoil or clean play sand (as a read-only zone). The key: safe, easy to clean, and non-toxic.
Hideouts, Decor, Climbing Elements
Your dragon needs retreats and climbing spots. I include two hide boxes (one on the warm side, one on the cool side), a basking rock or flat slab, branches or cork flats for climbing, and bark ledges. For a bearded dragon starter kit, lightweight but sturdy decor is ideal. As the dragon grows, you can refine aesthetics.
Water & Food Dishes, Hygrometer/Thermometer
You’ll need shallow water dishes (easy for dragons to drink but not drown in), food bowls for greens, and tools like a digital hygrometer/thermometer combo or separate units. I also include backup probes—trust me, having spares pays off.
Choosing the Right Sizes / Specifications
Minimum Tank Dimensions by Age
In my experience:
Hatchling: 75 × 45 × 45 cm (but upgrade early)
Juvenile: 90 × 45 × 45 cm
Subadult/Adult: 120 × 60 × 60 cm or more
If your starter kit includes a too-small tank, you’ll be forced to upgrade mid-growth, which can cause stress.
UVB Strength & Distance
Read the manufacturer specs. A 10 % T5 HO might have a “safe distance” area where UVB is effective. Place the basking perch so it lies within that zone. If your dragon rarely gets within that, you might as well not have UVB.
Safe Substrate Choices
Avoid calcium sand, walnut shells, wood shavings with aromatic oils, or untreated bark. These can injure reptiles. Stick with reptile carpet, slate tile, or smooth stone for most of the area. If your kit includes a dig box zone, ensure that the substrate is inert, cleaned, and monitored.
Setting Up the Kit – Step by Step
Arranging Zones (Bask, Cool, Hide)
First, lay the substrate or flooring. Then designate your zones: one side will be bask (hot), the opposite the cool side. Place the hides well apart—one hide in the warm area, one in the cooler region. Position the climbing elements so your dragon can gradually ascend.
Installing Lighting, Bulbs, and Fixtures
Mount your UVB fixture under the screen (don’t block with mesh), and test the angle. Add the basking bulb over the chosen basking perch. Secure cords and provide distance so the dragon can’t accidentally touch bulbs. Many kits include lamp arms or goosenecks—use them to fine-tune position.
Testing Temperatures & Gradients
Run the lights and heat sources for at least 24 hours before introducing any dragon. Use your digital probes to check that the basking zone reaches ~ 38–42 °C (100–108 °F) and the cool zone sits ~ 24–28 °C (75–82 °F). Adjust heights and power as needed. Document those ranges—you’ll refer to them daily.
Feeding and Nutrition Tools
Insect Containers & Feeding Tongs
You’ll want ventilated “cricket tubs” or small insect containers so live prey is ready. Feeding tongs help avoid accidental bites and give you control during feeding. A small “gut-loading station” may also be useful so you can feed your insects nutritious food before offering them to your dragon.
Greens, Veg Dishes & Supplement Tools
Small shallow bowls for greens and veggies are handy. I also include a fine mesh shaker or small dusting cup for calcium/vitamin powder, and a syringe for occasional calcium paste (if the vet recommends). These simple tools ensure your supplements are delivered efficiently.
Maintenance & Cleaning Tools
Substrate Replacement Tools
A small dustpan, reptile-safe scoop, and spare substrate pieces help keep the cage clean. I always include backup lining in the kit so I can swap in clean sections while cleaning.
Safe Cleaners, Brushes, Disinfectants
Your starter kit should include a reptile-safe disinfectant (like quaternary ammonium or veterinary-grade reptile cleaner), soft brushes, microfiber cloths, and gloves. I never use bleach or harsh chemicals—I learned early that residues upset reptile systems.
Budgeting – How Much Does a Starter Kit Cost?
Basic vs Premium Options
A very basic starter kit might run a few hundred (USD or EUR) if you pick middle-tier gear. A premium kit, with bioactive-ready enclosures, full-spectrum LED/UVB systems, thermostats, and decorative rockwork can push into the 500–700 range or more. I opted for mid-tier gear for my first, and upgraded pieces over time.
Hidden / Ongoing Costs
Don’t forget recurring expenses: replacing UVB bulbs (~6–12 months), electricity costs, substrate refreshes, supplements, live insects, and vet checkups. Over a dragon’s lifetime, these costs exceed the initial setup by far.
Upgrading Over Time
When to Grow to a Larger Tank
Once your dragon reaches ~12–14 in total length, I always watch its comfort. If it seems cramped, if it spends a lot of time on the screen, or if growth slows, that’s a sign to upgrade. I typically upgraded from a 75 → 120 cm enclosure for my first adult.
Upgrading Bulbs, Upgraded Decor
As time goes on, UVB technology improves. I’ve replaced older T8s with T5 HO or LED hybrid systems. Also, I gradually replaced plastic decor with natural rock and cork bark to mimic a desert habitat. Upgrades are evolutionary, not all at once.
Common Pitfalls & My Lessons Learned
One mistake I made: placing the substrate too close to the basking area, causing curling edges and burns. Another: forgetting to monitor humidity levels, which led to shedding problems. I also once plugged a UVB tube backward in a fixture and got no output for weeks. Small oversights can snowball. Documenting setup, having backups, and checking daily saves headaches.
Checklist for Every New Owner
- Enclosure and secure lid
- UVB + full-spectrum daylight bulb
- Basking heat bulb + thermostat
- Flooring (carpet/tile)
- Hide boxes (warm + cool)
- Climbing branches/basking rock
- Water & food dishes
- Temperature/humidity probes
- Insect containers + feeding tongs
- Supplement tools (dusting cup, syringe)
- Cleaning tools & reptile-safe disinfectant
- Backup bulbs, extra wiring, spare substrate
Check off each before bringing home your dragon.
Safety & Emergency Add-Ons
I also include a small first-aid kit: sterile gauze, Betadine (diluted), nutrient paste, and emergency contacts for a reptile vet. I also carry spare bulbs and extension cords—if a bulb fails, I can swap immediately without letting the habitat drop in temperature dangerously.
Sources & Where I Bought My Gear
I sourced many components via reptile specialty shops, local reptile expos, and trusted online vendors. I recommend reading reviews (especially photos) and buying from vendors who accept returns. I also joined reptile keeper groups and asked for feedback on gear—I still do that when trying something new.
Final Prep Before Bringing Home Your Bearded Dragon
Before introducing your dragon, run your kit for at least two full days, record stable temperature gradients, ensure no hot spots above safety thresholds, and test all electrical connections. Clean everything again. A calm, stable environment helps your new dragon acclimate and lowers stress.
Conclusion & Final Thoughts
Putting together a bearded dragon starter kit may feel daunting at first, but done right, it becomes a trusted habitat that keeps your dragon thriving year after year. Remember: the quality of your kit is reflected in your dragon’s health, behavior, and happiness. Use this guide as a blueprint, customize based on your space and budget, and evolve your setup over time. Treat each upgrade as a step in your dragon’s journey—because once they’re comfortable, they’ll reward you with vibrant colors, curious behavior, and a companionable nature.
FAQs
1. Do I absolutely need a UVB light from day one?
Yes. Without UVB, a bearded dragon cannot metabolize calcium properly and is at high risk of metabolic bone disease.
2. Can I use sand as substrate in a starter kit?
I don’t recommend loose sand in most of the enclosure—especially for younger dragons—because of the risk of impaction. Use tile, reptile carpet, or slate, and limit loose substrate to a small dig area if desired.
3. How often should I replace the UVB bulb?
Even when it still glows, a UVB bulb’s output declines. I replace mine every 6–12 months, depending on brand.
4. Should I include live plants in the starter kit?
Live plants are appealing, but can introduce pests or mold. I’d wait until your setup is stable and you’re comfortable with maintenance. Start with decor that’s easy to clean first.
5. What’s the most overlooked item in kits I’ve seen?
Backup bulbs and spare parts. Many new keepers don’t plan for failure. Having spares ready prevents stressful downtime for your dragon.